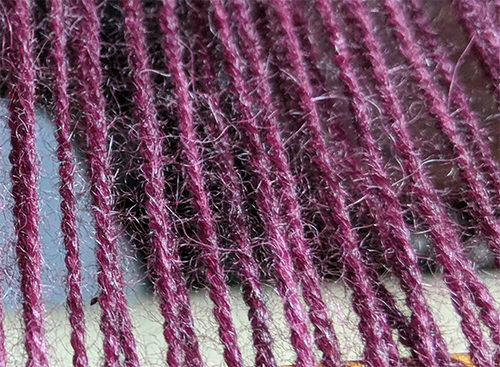
This, my friends, is my current warp. It is 6 yards of fingering-ish weight 2 ply alpaca. It is also very grabby, like mohair grabby. Some might say grabbier than a certain Osage toned politician, but let's not get political.
This warp wound onto the warp beam in 15 minutes. Well, 16 minutes and 12 seconds to be exact. I wound this back to front and thought I would share my method.
The key to any back to front warping is to have tension on the warp. I don't remember who I first heard it from, but all of my favorite weaving idols will tell you that a yarn under tension is a yarn under control. Winding a warp onto the beam under tension does more than make it easier to put it on the beam, it set you up for a better weaving experience all the way through. Tension while you are beaming means better cloth, easier.
The idea is to keep at least enough tension on the warp threads as you will use when you weave. More is ok, just not less. Another time or in the comments we can talk about why that is the guiding principal if anyone is interested. I always like to know the reasons why, but find that explaining them makes people's eyes cross.
As you can see, I have very little room at the back of my loom. There is between three and four feet at the most. So little room that I can not easily sectionally warp. So building off of the writing and videos of Laura Fry and Tien Chiu, I put up a warp valet. My warp valet is nothing fancy like Laura's is, it is simply 2 heavy duty plant hanger hooks in the ceiling with loops of texsolve cord hanging from them. When I get ready to warp I insert a broom handle into the texsolve loops. The whole set up is less than $20.
For weights, I use hand held barbells. I have 5lb and 3lb ones that I have cords attached too. I like the barbells over the jugs with water because I'm clumbsy. When the weights crash to the floor, they might smash my foot. When the jug crashes to the floor, it might smash my foot and break open, spilling its contents. Whether the content is water or sand or metal washers, it's a mess. (I might have a bit of experience with that) These weights were $3 each or so at a local big box store, so I felt it was a reasonable investment. I have four of each weight so that I can appropriately weight across my entire 48" loom.
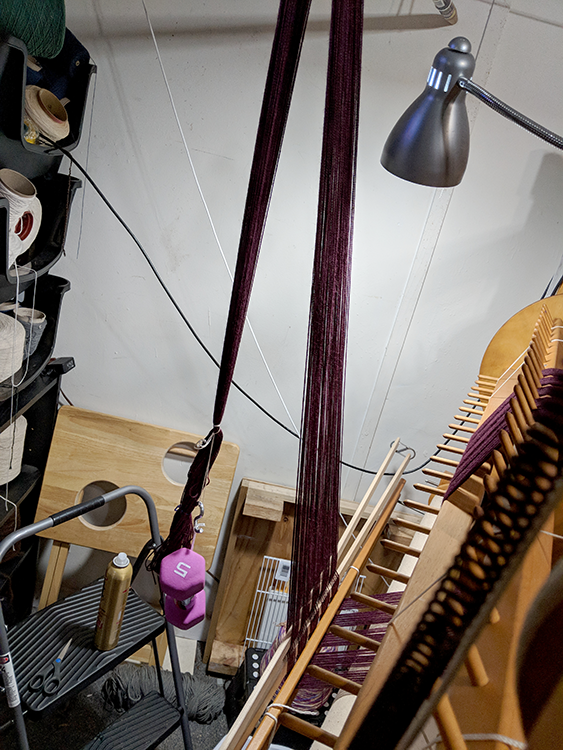
The final thing you will notice in this picture is the can of aerosol hair spray. I was fortunate enough to try to put on my first super sticky warp with Eileen Hallman. When I started running into trouble, she marched me to the dollar store and we got some maximum hold hair spray. I have never since found a warp dressing I like better.
I find that the starch based dressings leave an unsavory feeling to the warp. I also dislike how difficult it can be to remove the dressing from the cloth in finishing. Gelatin based dressings have the same problem, the warp threads can get stiff and they are hard to fully remove from the cloth. Hairspray on the other hand, is specifically designed to tame fly away protein fibers and to wash out cleanly with mild detergent (shampoo).
So, here's the actual process, step by step.
- With warp over valet and lease sticks near the raddle, give the warp a good snap and shake to straighten everything out.
- Look for loose threads and pull those over the valet bar.
- Hang weight near floor. Spray warp with hairspray front and back both sides of the valet and wait for it to dry. You don't need to soak it, just a light spray. It should dry in about 20 seconds.
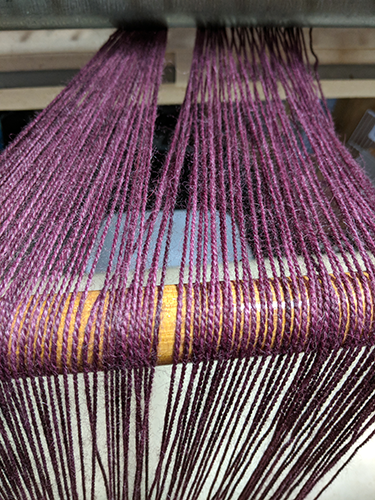
- Next, I like to separate the warp on the loom side of the valet along the path that the lease sticks will take. Basically, I slide my hand in where the upper lease stick is and slide up towards the valet. If I encounter resistance, I'll gently pull those threads apart. This separates any threads that were stuck together from the hairspray.
- Slide lease sticks up. If they meet resistance, look for a loose thread or threads in that spot and pull that thread or threads up and over the valet.
- When the lease sticks are at the top, wind warp onto the beam until the lease sticks are near the raddle.
Repeat the last 2 steps until the weight is near the valet, then go back to step three.
Once I am wound onto the warp beam, I re-purpose the broom handle. I hang it from the frame inside the loom so that the cross on the lease sticks is at a convenient height for threading. On my smaller x-frame loom I did something similar with cup hooks and a dowel rod.
Speaking of smaller x-frame looms...
If you have one or if your loom doesn't have a permanent place in your home, a warp valet may not be the ideal solution. A warping trapeze might be more your speed. Larua Fry has been blogging and Facebook posting one recently. Tien Chui used one with her AVL Workshop loom. These work the same way as a valet, just are attached to the loom or are free standing.
- badfaerie's Blog
- Log in or register to post comments